Thursday, March 31, 2016

How to Write a Good GREAT Letter of Introduction

Hello Students,
Your next assignment is to create a "Letter of Introduction" that describes you! Your special traits, qualities, hobbies, and personal, educational and career goals. List your top 5 skills and abilities. It should consist of at least one page. Make sure to use correct spelling and grammar.

Letter of Introduction Assignment:
  • This is an introduction letter, about you, written to people that may be viewing your portfolio
  • Should be about 1 page long

You letter should include:
  • Who you are
  • Where you are currently attending school
  • What courses you are currently enrolled in aside from standard courses (such as this ROP class your in right now)
  • Your top 5 work related skills
  • Special acknowledgments from employers/instructors
  • Future education plans
  • Hobbies or other activities you enjoy
  • Discuss what is contained in your portfolio
  • Discuss the type of work/projects/activities you enjoy the most in school

Sample Introduction Letter:

-----------------------------------------------------------------------------------------------------------------------------------

John Star
242 Crest St.
Capitola, CA 95010
(831) 553-2323
jostar@yahoo.com
Date

To Whom It May Concern:

I am currently attending Santa Cruz High School where I will be graduating this year in June. I have enrolled in ROP classes, which are business-oriented. ROP classes have given me a closer look at the business world and I have learned excellent work skills. 

My top five work skills are:
  • Excellent communication skills with strong listening skills
  • Responsible and reliable with attention to detail
  • Strong team player who thrives in teamwork situations
  • Good computer skills
  • Excellent time management skills
I have received special acknowledgement from my employers for strong skills and work ethics.
I recently was accepted to CalPoly and plan to go there in the Fall and pursue a degree in Agribusiness. After receiving my degree, I plan to work in my family’s strawberry farming business. Eventually, I hope to be the president of the business. I have many hobbies including surfing, skiing and playing baseball but most of all, I enjoy riding my horse up in the hills. It gives me a sense of freedom and independence.

My portfolio shows some of the skills and abilities I have acquired in while attending Soquel High School and throughout my work experience. I have always enjoyed landscaping and have enrolled in the Horticulture class for my last semester of high school. From my past experience you will notice that I enjoy working especially when I leave the job better than it was when I first got there. I have been doing tree work for three years and have worked for commercial and residential customers. Thoroughness and safety are some of my favorite qualities.

Included in this portfolio, is my resume summarizing my schooling, work experience, and skills. In addition I have a list of references, letters of recommendation, and samples of my work. I hope you enjoy reviewing my portfolio.

Sincerely,

John Star


Due by Friday!

 - Mr.W

Monday, March 28, 2016

New Assignment: Portfolio Website

Hello Students,
Your next assignment is to create a portfolio website that documents the skills you have developed in this course, documents the work you have completed in this and other courses and displays your prowess with writing html and css and incorporating graphics into your website. Your portfolio site must be rich in graphics and utilize the techniques from our previous projects. You are also required to write about yourself and to complete some research and write about your possible future career path, whatever that may be. You may draw upon and incorporate work you have completed from any previous ROP class, or can include examples of any work or projects or other classes or even hobbies that you are particularly proud of.

The organization of this site should mirror the ROP Career Portfolio.  Review the portfolio handbook in detail for tips on writing your letter of introduction and creating the other sections of your website. Download the ROP Portfolio Handbook to use as a guide for creating your own portfolio website.

Portfolio Website Technical Requirements:
  • Your portfolio website must have the following sections:
    1. Front page: file must be named index.html for proper functionality. Think of this as the cover of a book about you. This page can contain your letter of introduction
    2. Career Development: This should contain your resume, your career research assignment and your letter of recommendation.
    3. Work Samples: This can be multiple sections, this should include graphic projects, animations, written assignments, lecture notes, artwork, previous website projects, etc. Anything you have created that makes you proud should be included as long as it's content is professional. Written details about each work sample must be included
    4. Contact: This page can contain your email and any other links or contact information, no phone #'s or mailing addresses
    1. This project must be created or edited with a text or code editing program such as Komodo
    2. This project must utilize a platform that provides mobile ready responsive design, W3C.CSS/Bootstrap/Etc..
    3. Each page must display your web page title or name in the <title> area and self explanatory, such as "Seth Wilsons ROP Web Design Portfolio"
    4. Each page must contain the HTML 5 DocType declaration that will enable you to use the HTML Validator, your pages should strive to validate 100%
    5. Each page must contain the character encoding meta tag for utf-8 and each page must be formatted for utf-8 when created
    6. Each page must contain either graphic buttons or text links to the HTML and CSS validators. Make sure you use the code to validate as HTML 5. Put these at the bottom of the page or incorporate them into your page design so that they are not obtrusive
    7. Each page should contain colors for text, backgrounds and link states
    8. Each page should use the same font families and use consistent sizing, spacing and style
    9. When complete the entire website must be less than 20Mb in file size

    Portfolio Content Requirements:
    • Have an example of everything required in the ROP portfolio handbook, letter of introduction, letter of recommendation, resume, work samples
    • Take a photo of yourself to include in the front page, this photo can be turned into an illustration with Illustrator or processed with Photoshop if you like. A camera can be provided upon request.
    • Research 1 possible career you are interested in and write a 1 page paper about the career, what does it involve, what is the salary range, what kind of education do you need, how do you break into the career. Include this in your "Career Development" section. 
    • Show your best or favorite work samples in the work samples section of your website, minimum of 3 examples must be shown, more is encouraged. You can include work from other art, design or ROP classes. Write a 1-2 paragraph summary for each work sample.
    • Include your resume and letter of introduction in the career development section if your website. Do not include phone numbers or mailing addresses, only email addresses for contact info.
    Design Style:
    • Your website should be professional and clean looking
    • Your website layout should be easy to navigate and text should be easy to read
    • Each page should show the same menu at the top for easy navigation
    • Your website should show good design choices for fonts, colors and style
    • Your website should demonstrate the techniques, skills and abilities you have studies during the course of this class
    • Your website should be viewable on mobile devices
    Website Flow/Organization:
    Your website must follow the flowchart below as closely as possible...


    Meeting the minimum requirements above does not guarantee an A+. You must put the time and energy into the project and really use it as an opportunity to shine. Include more material and content and information to guarantee a stellar grade. Must be original work that you created, create some artwork, take some photographs, make a movie, write a paper... this is your portfolio, make it shine.


    How To Add Validation to your website:
    Validating HTML and CSS is a great way to demonstrate your coding skills. Use the code below at the bottom of your page to add a validate button to your pages...
    This is an example of code to add both HTML and CSS Validate buttons to your webpage
    This is how the Validate code above will be displayed, you could also use an HTML5 logo and CSS logo to make graphical buttons for your validators

    How Your Portfolio will be evaluated:
    • Contains required content and format
    • Well organized
    • Free of grammar errors
    • ROP related work samples
    • Shows creativity
    • Shows skill development
    • Appropriate for use in job search
    • Professional yet creative appearance
    Final Portfolios are due May 6th!

    Grading for total of 10 points:
    20 Points - Portfolio website meets assignment specs and requirements
    20 Points - Portfolio contains all sections
    20 Points - Portfolio links work correctly and is error free (including spelling and grammer)
    20 Points - Portfolio has no missing graphics or elements
    20 Points - Portfolio turned in on time and is awesome and is 6Mgb or smaller

    Check out these collections of amazing portfolio sites for inspiration:

    Check out these examples of web page portfolio designs from previous students:


    Ok, stay focused, work hard and have fun!

     - Mr.W

    Tuesday, March 22, 2016

    Gif Animation Challenge

    Hello Students,
    Your newest assignment will challenge your animation and creativity skills to the max! Choose one of the challenges below to complete, but choose wisely!

    Gif Animation Challenge:


    Choose one of the subjects below to animate, BUT CHOOSE WISELY! :
    • A cat is typing on a keyboard and angrily shoves the computer off the desk
    • Col. Sanders is a DJ spinning records on a turntable in a dance club
    • Donald Trump removes his face like halloween mask to reveal a reptilian creature
    • Add explosions to a video clip to as an homage to action movie scenes
    • Find a short video clip of a sword fight and replace the swords with Light Sabers


    Good luck!

    Previous Student Work Examples:


    Thursday, March 17, 2016

    New Assignment: Making Animated Gifs

    Hello Students,
    Your new assignment is an introduction to making animated Gifs, and harnessing your skills to create a more elaborate animation or a cinemagraph style gif.


    What is an animated Gif? A Gif file is a web safe file format that has a cool feature, it can have different frames like a video, you can also change the playback speed and duration per frameUnfortunately they can't have sound. You can do some really cool stuff with Gif's. Check out Fluxmachine for inspiration.


    What is a Cinemagraph? A Cinemagraph is just a fancy digital photography term for an animated Gif that has the appearance of a still image (graph) with small portions of the image appearing to be moving or appear to be animated (cinema). Some Cinemagraphs will loop the animation constantly, some repeat with a delay to give the viewer a surprise when the photo they are looking at suddenly turns and looks back at them or blinks.

    This cinemagraph is made from the frames of a movie and has a very short loop of just the eyes blinking...
    This Cinemagraph was created by a photography student in Mr.Wilson's Digital Photography Class at SCHS

    Gif Assignment:
    Part A
    • Create an animated gif, you can use photographs to make an animation, or a short animation with sequential drawings on paper. You can use found images as well or even short video clips. Think of something simple for the first example... just use your imagination and use this opportunity to become familiar with the gif process
    • Follow the instructions below as a rough guide only. There are several ways to make animated gifs in photoshop. Try a google search and you will find many tutorials and different techniques
    • This is just a quick project to get you used to creating gifs, make sure they are short, not too big in file size and loop forever. Use the Save For Web dialog box in Photoshop to adjust the file size and dimensions
    • This Gif should have at least 10 frames of animation

    Part B
    • Create a longer animation this time that loops perfectly. Try creating a character and animating them, you can use photos or cartoons or draw your own with the brush tool in photoshop, just create individual frames of animation as layers, 1 layer per frame... then you can use the layers to frames option in the animation palette sub-menu.
    • You can use photos. Use the Continuous Shooting mode on a camera for rapid fire shooting of frames. A Video camera on a tripod may also be used, photoshop can read some video files
    • Try creating a Cinegraph style animation. Try to create an effect where just one part of the image is moving, such as eyes moving/blinking or the head turns and looks at the camera.

    How to make an animated Gif with Photoshop CS5:
    • Launch Photoshop
    • FILE / OPEN a new document at your desired size, I made mine at 200X180 Pixels. It's a good idea not to make Gif files too large, otherwise they can take along time to load over an internet connection.
    • Your animation can be a series of images, photos etc. You can hand draw each frame the animation also. The key is to set up separate layers with the layer palette that you will turn into frames of animation. Im using some pictures I took of my dog.


    • Click your top Layer, then while holding SHIFT click on your bottom Layer to select all layers
    • Open the Animation Palette and click on it's Sub-Menu and then select Make Frames From Layers
    • If you don't see individual frames in your Animation Palette, go to the Sub-Menu and select Convert To Frame Animation
    • You can now designate individual durations on each frame.
    • Go to FILE / SAVE FOR WEB AND DEVICES to export your animation as an animated Gif file. Make sure to set your looping options to forever.


    • Open your Gif file in a web browser to test it. Here's my result:


    Previous Student Work Samples:


    Monday, March 14, 2016

    Learning Bootstrap: Bootstrap Tutorial

    Hello Students,
    Your next assignment is to work through the Bootstrap tutorial on W3Schools.com and create a website using the bootstrap platform. Follow the tutorial, or follow along with the class to create an example, then create a compelling website utilizing the bootstrap framework. Bootstrap is the most popular HTML, CSS and Javascript framework being used to develop responsive and mobile friendly websites. Bootstrap is completely free and open source!


    Assignment: After working through the bootstrap tutorial below, create a single/multi page website about a subject of your choice, you could create a website for a class project, document something you created or participated in, etc. Think about how this project could be used to your benefit (book report, etc). You can document your favorite hobby, band, sports, celebrity, movie, video game, etc.

    Bootstrap Page Assignment Specs:
    • Single scrolling or multiple page website, subject is your choice
    • Website should be complete with information, photos or gif's, content (150 words minimum), links, resources etc
    • Website must be built with bootstrap frame work, be free of glitches or errors and function correctly when uploaded to server
    • Website must contain menu at top of page for navigation
    • Website must contain 1 external link
    • Website must contain credit with link to your email at bottom of page or contained in an "about" or "contact" section (this page created by "insert name") with email hot-linked
    • Website must be free of errors or bugs, broken links etc...

    Tutorial: Read through the bootstrap tutorial... try out each step and create your own gallery page that demonstrates the following bootstrap elements:

    Download and Modify Bootstrap to Customize your Template:
    Want to change the colors of your template? Download bootstrap and re-link your html file to the downloaded bootstrap CSS file.  Click the following link and un-zip the contents into your project folder. Change the bootstrap link code to embed the local bootstrap resource instead of using the online resource.

    Link: Download Bootstrap

    Customize Your Bootstrap Colors:
    Want to change the color scheme of your template? Check out the link below, you can upload a photo and create a color scheme, or choose one of their pre-made ones. Copy-paste the CSS into the bootstrap.min.css file.

    Link: Custom Color Scheme's for Bootstrap

    Custom palette on my sample bootstrap page.

    Monday, March 7, 2016

    Advancing Your Web Skills: Layout and Responsive Design

    Hello Students,
    Our newest assignment is to create a progression of small web pages that demonstrate layout, responsiveness and then utilize W3C CSS to enhance the responsiveness of your page, and finally complete a single page utilizing all the W3C CSS tools to make a page with layout that is responsive, meaning it can be viewed on many different screen sizes

    Assignment:
    Work with the class, or read and work independently and develop 4 single pages, demonstrating layout, responsiveness, responsiveness with layout, and finally a full W3C CSS page:

    1: Layout with HTML and CSS: W3Schools - HTML Layout

    This page utilizes HTML and CSS to layout elements using the Header, Nav, Aside,  Section and Footer classes

    2: Responsiveness with HTML and CSS: W3Schools - Responsive Design

    This sample site uses simple block classes to "stack" elements when the screen is resized

    3: Responsive Page Enhanced With W3C.CSS: W3C.CSS

    Building off the previous page the block classes are replaced with the w3-container, w3-row-padding and w3-third classes for enhanced responsiveness

    4: Full W3C.CSS Layout and Responsive Page: W3C.CSS Sample

    This page utilizes many of the W3C.CSS features such as Header, navbar, drop down, card and container W3C.CSS features.

    When these pages are complete upload them to your server space for testing or turn in via USB drive.


    - Mr.W

    Thursday, March 3, 2016

    Getting Closer to Validation: Metadata and Character Encoding

    Character Encoding for Web Pages: HTTP file headers


    Validation Assignment:


    Details About Character Encoding and Validation:

    Hypertext Transfer Protocol (HTTP) is the language used by a Web server and a Web browser to communicate with each other.

    Every time a Web server serves a page to the browser, it adds an invisible "HTTP response header" to the file. This file header (not to be confused with the <head> section of a document) is metadata, which means it contains information about the file that it is serving to the browser. Many servers include character encoding (the character set used in the document) in this header. In other words, the server tells the browser how the document is encoded. (But, what the server says about the encoding may not be how the documents it serves are actually encoded; this is determined by your text editor when it saves a file.)

    Most servers will say the files it serves are either ISO-8859-1 (Western European Latin characters) or the newer Unicode standard, UTF-8. In documents written in English there is little difference between these two standards; most noticeable differences will be in special punctuation. But if you wish to have your Web page display more than Western European languages (perhaps a page that mixes English with Chinese, for example), you cannot use ISO-8859-1; UTF-8 would be the way to go. At any rate, UTF-8 is the current standard for Web pages.

    Browsers (also called "user agents") use an "HTTP request header" when requesting a file from the server. In this request header the browser identifies itself with a "user agent string." By keeping track of these user agent strings, Web traffic analysis software can create logs showing information on what percentage of users come to a site with Firefox, Safari, or Internet Explorer, for example.
    Thecharacterencodingmeta tag

    Many servers, but not all, indicate the character encoding in the HTTP response header. But whether or not your pages are on a server that indicates the encoding, you should do so in the document itself, by adding the appropriate character encoding meta tag to the head section. Assuming the document was encoded in UTF-8, and is using HTML 5, you simply need to add this to the <head> section:

    <meta charset="utf-8">

    Because this tag tells the browser how to interpret the characters used in the document, it should be the first tag in the<head> section.

    The HTML validator needs to know which character set the document is encoded in so it can properly evaluate it. So if your pages are on a server that does not indicate the encoding, it is necessary to add the character encoding meta tag to your HTML or the validator may not be able to properly evaluate the page. Additionally, if your pages are not being served by a Web server (they are being viewed locally, or perhaps they are to be burned onto a CD) the browser will need the character encoding meta tag in your HTML to properly display the page.

    In the case where the server indicates the encoding, and you also indicate the encoding with the character encoding meta tag, there is no problem if your tag and the file header from the server indicate the same encoding. But if the server says the encoding is, for example, ISO-8859-1, and your meta tag says UTF-8, the validator will give you a "character encoding mismatch" error. In such a situation the validator assumes the server's encoding is the one to use. In other words, in the event of a conflict between your tag and the server, the server overrides your character encoding meta tag.

    How to see a server’s character encoding setting:

    To see what your server says about the pages it is serving, you need a way to see its invisible file response header. A tool such as Rex Swain's HTTP Viewer will allow you to see this, including the character encoding, if any is indicated. Go there and enter a URL for a server that you wish to check then look at the "Receiving header."

    If you see something like:
    Content-Type:·text/html;·charset=UTF-8
    then you know the server says the documents it is serving are encoded as UTF-8.

    If you see something like:
    Content-Type:·text/html;·charset=iso-8859-1
    then you know the server says the documents it is serving are encoded as ISO-8859-1.

    If you see something like:
    Content-Type:·text/html
    then your server is not indicating the character encoding.

    Remember that if your server does not indicate the character encoding, it is even more important that your pages contain the character encoding meta tag. This will give the browser the information it needs to properly render your page (otherwise it will have to guess at the encoding, and it may guess wrong), and it will give the HTML validator the information it needs to properly evaluate your page.
    Keepeverythingin synch

    To make sure the browser renders your page as you intend (so that special characters such as curly quotes, apostrophes, accented characters, dashes, etc. display properly), and to enable the HTML validator to work, it is important that the server’s character encoding setting, your page’s character encoding meta tag, and the actual character encoding of the document all match.

    It is recommneded that Web pages use the UTF-8 encoding. To ensure that your pages are actually encoded as UTF-8, your text editor must be configured to save your pages as UTF-8

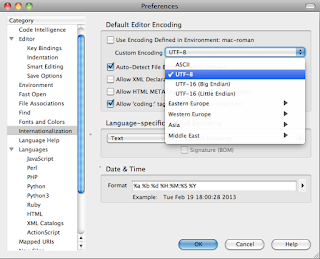
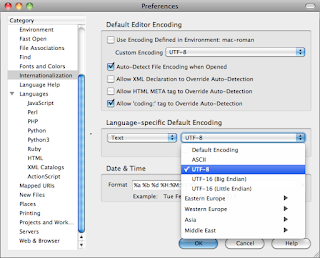
    Setting Komodo Preferences for UTF-8 / No BOM:

    Launch Komodo and go to File/Preferences/Internationalization.
    Uncheck the top option box to find the UTF-8 option in the pulldown menu
    Change this second language-specific default encoding option to UTF-8.
    Leave Signature BOM unchecked.

    Tuesday, March 1, 2016

    Create a 3D Cube with CSS3 and HTML5

    Hello Students,
    Your next task is to take your CSS and HTML skills to the next level by creating a rotating 3D cube.

    a 3D cube created with CSS (although this one is actually a GIF, but the source was all code... HONEST!!!)
    3D, it's like two dimensions plus one!:
    Since the dawn of computers we have been trapped in a 2 dimensional world of drab boring flatness. No more my digital bretheren! To me pixel warriors! Use CSS3 and HTML to create outstanding dimensional modifications to your content! Your assignment is to follow the linked tutorial to create a 3D cube, use your own creativity to modify and make your cube unique! The link below will show you a tutorial to make a 3D cube, but it is not the only tutorial online to complete this task, try searching for other tutorials if you like and try them out.

    Link: Create an impressive 3D cube

    Cube Assignment: "Aut inveniam viam aut faciam"
    • When your CSS gallery is complete, create this 3D cube to sit at the top of your gallery page
    • Follow the tutorial carefully, read the entire tutorial and don't skip a single sentence or step. If you hit a snag, research, re-read, ask, experiment!
    • Research and consult with classmates when you encounter difficulties... this is important, success may be out of grasp without the help of our comrades. You will have to rely on each other to complete this assignment.
    Have fun!

    - Mr.W