Wednesday, February 28, 2018

Learning Bootstrap: Bootstrap Tutorial and Project

Hello Students,
Your next assignment is to work through the Bootstrap tutorial on W3Schools.com and create a website using the bootstrap platform. Follow the tutorial, or follow along with the class to create an example, then create a compelling website utilizing the bootstrap framework. Bootstrap is the most popular HTML, CSS and Javascript framework being used to develop responsive and mobile friendly websites. Bootstrap is completely free and open source!


Our own schsdigitalmedia.com website was created using the bootstrap frame work to provide flexibility and ease of use for users from mobile devices, tablets, etc.


Assignment: After working through the bootstrap tutorial below, create a single/multi page website about a subject of your choice, you could create a website for a class project, document something you created or participated in, etc. Think about how this project could be used to your benefit (book report, etc). You can document your favorite hobby, band, sports, celebrity, movie, video game, etc.

Bootstrap Page Assignment Specs:
  • Single scrolling or multiple page website, subject is your choice
  • Website should be complete with information, photos or gif's, content (150 words minimum), links, resources etc
  • Website must be built with bootstrap frame work, be free of glitches or errors and function correctly when uploaded to server
  • Website must contain menu at top of page for navigation
  • Website must contain 1 external link
  • Website must contain credit with link to your email at bottom of page or contained in an "about" or "contact" section (this page created by "insert name") with email hot-linked
  • Website must be free of errors or bugs, broken links etc...
  • Final website displays good use of typography, color palettes and shows understanding of the elements and principles of design

Tutorial: Read through the bootstrap tutorial... try out each step and create your own gallery page that demonstrates the following bootstrap elements:

Download and Modify Bootstrap to Customize your Template:
Want to change the colors of your template? Download bootstrap and re-link your html file to the downloaded bootstrap CSS file.  Click the following link and un-zip the contents into your project folder. Change the bootstrap link code to embed the local bootstrap resource instead of using the online resource.

Link: Download Bootstrap

Wednesday, February 21, 2018

Advancing Your Web Skills: Layout and Responsive Design

Hello Students,
Our newest assignment is to create a progression of small web pages that demonstrate layout, responsiveness and then utilize W3C CSS to enhance the responsiveness of your page, and finally complete a single page utilizing all the W3C CSS tools to make a page with layout that is responsive, meaning it can be viewed on many different screen sizes

Assignment:
Work with the class, or read and work independently and develop 4 single pages, demonstrating layout, responsiveness, responsiveness with layout, and finally a full W3C CSS page:

1: Layout with HTML and CSS: W3Schools - HTML Layout

This page utilizes HTML and CSS to layout elements using the Header, Nav, Aside,  Section and Footer classes

2: Responsiveness with HTML and CSS: W3Schools - Responsive Design

This sample site uses simple block classes to "stack" elements when the screen is resized

3: Responsive Page Enhanced With W3C.CSS: W3C.CSS

Building off the previous page the block classes are replaced with the w3-container, w3-row-padding and w3-third classes for enhanced responsiveness

4: Full W3C.CSS Layout and Responsive Page: W3C.CSS Sample

This page utilizes many of the W3C.CSS features such as Header, navbar, drop down, card and container W3C.CSS features.

When these pages are complete upload them to your server space for testing or turn in via USB drive.


- Mr.W

Tuesday, February 20, 2018

Getting Closer to Validation: Metadata and Character Encoding

Character Encoding for Web Pages: HTTP file headers

Validation Assignment:


Details About Character Encoding and Validation:

Hypertext Transfer Protocol (HTTP) is the language used by a Web server and a Web browser to communicate with each other.

Every time a Web server serves a page to the browser, it adds an invisible "HTTP response header" to the file. This file header (not to be confused with the <head> section of a document) is metadata, which means it contains information about the file that it is serving to the browser. Many servers include character encoding (the character set used in the document) in this header. In other words, the server tells the browser how the document is encoded. (But, what the server says about the encoding may not be how the documents it serves are actually encoded; this is determined by your text editor when it saves a file.)

Most servers will say the files it serves are either ISO-8859-1 (Western European Latin characters) or the newer Unicode standard, UTF-8. In documents written in English there is little difference between these two standards; most noticeable differences will be in special punctuation. But if you wish to have your Web page display more than Western European languages (perhaps a page that mixes English with Chinese, for example), you cannot use ISO-8859-1; UTF-8 would be the way to go. At any rate, UTF-8 is the current standard for Web pages.

Browsers (also called "user agents") use an "HTTP request header" when requesting a file from the server. In this request header the browser identifies itself with a "user agent string." By keeping track of these user agent strings, Web traffic analysis software can create logs showing information on what percentage of users come to a site with Firefox, Safari, or Internet Explorer, for example.
Thecharacterencodingmeta tag

Many servers, but not all, indicate the character encoding in the HTTP response header. But whether or not your pages are on a server that indicates the encoding, you should do so in the document itself, by adding the appropriate character encoding meta tag to the head section. Assuming the document was encoded in UTF-8, and is using HTML 5, you simply need to add this to the <head> section:

<meta charset="utf-8">

Because this tag tells the browser how to interpret the characters used in the document, it should be the first tag in the<head> section.

The HTML validator needs to know which character set the document is encoded in so it can properly evaluate it. So if your pages are on a server that does not indicate the encoding, it is necessary to add the character encoding meta tag to your HTML or the validator may not be able to properly evaluate the page. Additionally, if your pages are not being served by a Web server (they are being viewed locally, or perhaps they are to be burned onto a CD) the browser will need the character encoding meta tag in your HTML to properly display the page.

In the case where the server indicates the encoding, and you also indicate the encoding with the character encoding meta tag, there is no problem if your tag and the file header from the server indicate the same encoding. But if the server says the encoding is, for example, ISO-8859-1, and your meta tag says UTF-8, the validator will give you a "character encoding mismatch" error. In such a situation the validator assumes the server's encoding is the one to use. In other words, in the event of a conflict between your tag and the server, the server overrides your character encoding meta tag.

How to see a server’s character encoding setting:

To see what your server says about the pages it is serving, you need a way to see its invisible file response header. A tool such as Rex Swain's HTTP Viewer will allow you to see this, including the character encoding, if any is indicated. Go there and enter a URL for a server that you wish to check then look at the "Receiving header."

If you see something like:
Content-Type:·text/html;·charset=UTF-8
then you know the server says the documents it is serving are encoded as UTF-8.

If you see something like:
Content-Type:·text/html;·charset=iso-8859-1
then you know the server says the documents it is serving are encoded as ISO-8859-1.

If you see something like:
Content-Type:·text/html
then your server is not indicating the character encoding.

Remember that if your server does not indicate the character encoding, it is even more important that your pages contain the character encoding meta tag. This will give the browser the information it needs to properly render your page (otherwise it will have to guess at the encoding, and it may guess wrong), and it will give the HTML validator the information it needs to properly evaluate your page.
Keepeverythingin synch

To make sure the browser renders your page as you intend (so that special characters such as curly quotes, apostrophes, accented characters, dashes, etc. display properly), and to enable the HTML validator to work, it is important that the server’s character encoding setting, your page’s character encoding meta tag, and the actual character encoding of the document all match.

It is recommneded that Web pages use the UTF-8 encoding. To ensure that your pages are actually encoded as UTF-8, your text editor must be configured to save your pages as UTF-8

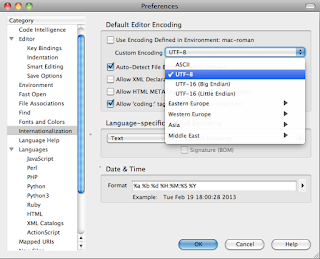
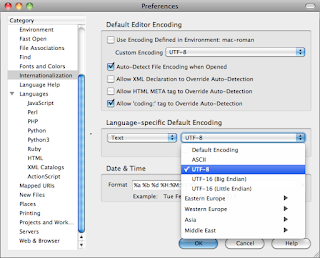
Setting Komodo Preferences for UTF-8 / No BOM:

Launch Komodo and go to File/Preferences/Internationalization.
Uncheck the top option box to find the UTF-8 option in the pulldown menu
Change this second language-specific default encoding option to UTF-8.
Leave Signature BOM unchecked.

Monday, February 5, 2018

CSS Mini Page + Writing Assignment

Hello Students,
Read the details of this project thoroughly before beginning, it consists of 2 parts. Part 1 is a writing assignment that must be created as a simple HTML page and includes organization of your notes taken in-class during lectures. The second assignment is to create a CSS script to enhance the look of the HTML page. Due on Friday


Part 1:
Writing Assignment - A Summary of our studies in ROP Web Design including all class notes

  1. Create a new blank HTML file
  2. Format the HTML file with the proper HTML tags and Doctype declaration
  3. Write a title for your page. Format it with the h1 tag
  4. Write a subtitle for your page that includes your name and grade and what city you where born in. Format it with the h2 tag
  5. In your own words write a paragraph that summarizes your experience with computers and programming before this class began. Format it with the paragraph tag
  6. In your own words, write a second paragraph that summarizes what you have learned so far in this ROP Web Design class.Format it with the paragraph tag
  7. Add your notes from the previous lecture "how the internet works" and "the history of the internet" and todays lecture as well "CSS".
  8. Save your document in a new project folder called "mini css site" and make sure it is called "index.html"
Part2:
CSS Assignment - Format Your Content
  1. Create a new blank CSS file
  2. Create a set of CSS Rules to format your h1, h2 and p tags
  3. Use CSS to modify the color of your text, the font and the text size
  4. Use CSS to modify your p tag to indent your text and create a colored background for the paragraph
  5. Focus on clear and legible typography and color choices that enhance the appearance.
  6. Explore CSS properties to enhance your page, use CSS creatively!
  7. Save your CSS document in the same folder as your HTML file
  8. Create a link in the head of your HTML document to link to your CSS file
  9. Test, upload, debug, re-upload to make it perfect!
When your project is complete, turn it in via USB drive for uploading to our server. Test, debug, fix and re-pload as needed.

Have fun!

Resources:
Link: Example Page