Wednesday, February 26, 2014

Introduction to Computer Graphics


Hello Students,
What does this car have to do with video games? Today's lesson is about the two image creation methods that exist in digital media. Raster or bitmap graphics are what most computer users are familiar with... these could be a photograph on a website or a video that you watch. The other method is vector graphics.


It's all about connections. Pierre Bezier was an engineer and one of the founders of geometric modeling and in the field of calculating curves for CAD/CAM systems and was a leading engineer at Renault, bringing this technology to auto manufacturing. Early video games such as space invaders used vector graphics also. Now a bezier curve can exist in 2 dimensions or three, modern video games can use 3D models that are comprised of "Nurbs" or "Non-Uniform Rational B-Splines". These are basically 3D objects that are created by bezier curves and have "surfaces" between the curves to create a shape. These are all examples of vector graphic technology being used in different ways.

Raster or Bitmap graphics are also used in video games. Early games used small graphics called "sprites" to create animated video game characters. In modern 3 dimensional games, bitmap graphics are used to create textures on 3D graphics.


Let's Make Some Pixels! Bitmap Icon Art Assignment:

  • Open Photoshop and create a new document, set width and height to 32 Pixels and resolution to 72DPI
  • Zoom in to fill screen, you will see a pixel grid
  • Select the Pencil Tool, set brush size to 1 Pixel
  • Create a new layer
  • Begin to draw your icon, use different colors and paint your image in pixel by pixel
  • When finished create a new folder for this project, then go to File > Save for Web and Devices, Set file format to GIF and save a file for turning in. Then go to File > Save and save a Photoshop version of your file.
Vector Assignment, Transform Box to Car:

  • Open Illustrator and create a new document, File>New
  • Draw a box about 4X4 inches
  • Click on the Pen Tool and hold to reveal the hidden tools and select the Add Anchor Point Tool (it looks like the Pen Tool with a + next to it)
  • Begin clicking on the box outline to add anchor points, several to each side
  • Switch over to the Direct Selection Tool and Click-Drag an anchor point to move it
  • Continue dragging your anchor points to modify the shape
  • Keep adding anchor points and moving them to create the outline of an automobile
  • Add more anchor points and adjust to smooth out your creation
  • Use Illustrators simple drawing tools such as the circle tool and pen tool to customize your creation. Add colors too!
  • When finished create a new folder for this project, then go to File > Save for Web and Devices, Set file format to GIF and save a file for turning in. Then go to File > Save and save an Illustrator version of your file.


Raster vs Vector Lecture Slides:


Monday, February 24, 2014

Getting Closer to Validation: Metadata and Character Encoding


Character Encoding for WebPages: HTTP file headers

Hypertext Transfer Protocol (HTTP) is the language used by a Web server and a Web browser to communicate with each other.

Every time a Web server serves a page to the browser, it adds an invisible "HTTP response header" to the file. This file header (not to be confused with the <head> section of a document) is metadata, which means it contains information about the file that it is serving to the browser. Many servers include character encoding (the character set used in the document) in this header. In other words, the server tells the browser how the document is encoded. (But, what the server says about the encoding may not be how the documents it serves are actually encoded; this is determined by your text editor when it saves a file.)

Most servers will say the files it serves are either ISO-8859-1 (Western European Latin characters) or the newer Unicode standard, UTF-8. In documents written in English there is little difference between these two standards; most noticeable differences will be in special punctuation. But if you wish to have your Web page display more than Western European languages (perhaps a page that mixes English with Chinese, for example), you cannot use ISO-8859-1; UTF-8 would be the way to go. At any rate, UTF-8 is the current standard for Web pages.

Browsers (also called "user agents") use an "HTTP request header" when requesting a file from the server. In this request header the browser identifies itself with a "user agent string." By keeping track of these user agent strings, Web traffic analysis software can create logs showing information on what percentage of users come to a site with Firefox, Safari, or Internet Explorer, for example.
Thecharacterencodingmeta tag

Many servers, but not all, indicate the character encoding in the HTTP response header. But whether or not your pages are on a server that indicates the encoding, you should do so in the document itself, by adding the appropriate character encoding meta tag to the head section. Assuming the document was encoded in UTF-8, and is using HTML 5, you simply need to add this to the <head> section:

<meta charset="utf-8">

Because this tag tells the browser how to interpret the characters used in the document, it should be the first tag in the<head> section.

The HTML validator needs to know which character set the document is encoded in so it can properly evaluate it. So if your pages are on a server that does not indicate the encoding, it is necessary to add the character encoding meta tag to your HTML or the validator may not be able to properly evaluate the page. Additionally, if your pages are not being served by a Web server (they are being viewed locally, or perhaps they are to be burned onto a CD) the browser will need the character encoding meta tag in your HTML to properly display the page.

In the case where the server indicates the encoding, and you also indicate the encoding with the character encoding meta tag, there is no problem if your tag and the file header from the server indicate the same encoding. But if the server says the encoding is, for example, ISO-8859-1, and your meta tag says UTF-8, the validator will give you a "character encoding mismatch" error. In such a situation the validator assumes the server's encoding is the one to use. In other words, in the event of a conflict between your tag and the server, the server overrides your character encoding meta tag.
How to seeaserver’scharacterencodingsetting

To see what your server says about the pages it is serving, you need a way to see its invisible file response header. A tool such as Rex Swain's HTTP Viewer will allow you to see this, including the character encoding, if any is indicated. Go there and enter a URL for a server that you wish to check then look at the "Receiving header."

If you see something like:
Content-Type:·text/html;·charset=UTF-8
then you know the server says the documents it is serving are encoded as UTF-8.

If you see something like:
Content-Type:·text/html;·charset=iso-8859-1
then you know the server says the documents it is serving are encoded as ISO-8859-1.

If you see something like:
Content-Type:·text/html
then your server is not indicating the character encoding.

Remember that if your server does not indicate the character encoding, it is even more important that your pages contain the character encoding meta tag. This will give the browser the information it needs to properly render your page (otherwise it will have to guess at the encoding, and it may guess wrong), and it will give the HTML validator the information it needs to properly evaluate your page.
Keepeverythingin synch

To make sure the browser renders your page as you intend (so that special characters such as curly quotes, apostrophes, accented characters, dashes, etc. display properly), and to enable the HTML validator to work, it is important that the server’s character encoding setting, your page’s character encoding meta tag, and the actual character encoding of the document all match.

It is recommneded that Web pages use the UTF-8 encoding. To ensure that your pages are actually encoded as UTF-8, your text editor must be configured to save your pages as UTF-8

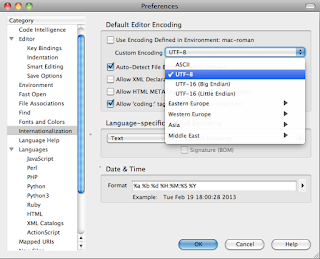
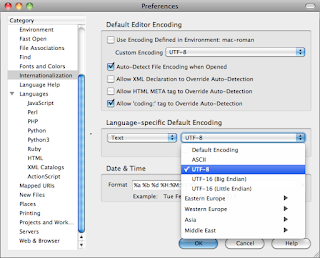
Setting Komodo Preferences for UTF-8 / No BOM:

Launch Komodo and go to File/Preferences/Internationalization.
Uncheck the top option box to find the UTF-8 option in the pulldown menu
Change this second language-specific default encoding option to UTF-8.
Leave Signature BOM unchecked.

Friday, February 14, 2014

CSS Mini Page + Writing Assignment


Hello Students,
Read the details of this project thoroughly before beginning, it consists of 2 parts. Part 1 is a writing assignment that must be created as a simple HTML page. The second assignment is to create a CSS script to enhance the look of the HTML page. Due on Tuesday.

Part 1:
Writing Assignment - A Summary of our studies in ROP Web Design

  1. Create a new blank HTML file
  2. Format the HTML file with the proper HTML tags and Doctype declaration
  3. Write a title for your page. Format it with the h1 tag
  4. Write a subtitle for your page that includes your name and grade and what city you where born in. Format it with the h2 tag
  5. In your own words write a paragraph that summarizes your experience with computers and programming before this class began. Format it with the paragraph tag
  6. In your own words, write a second paragraph that summarizes what you have learned so far in this ROP Web Design class.Format it with the paragraph tag
  7. Add your notes from the previous lecture "how the internet works" and "the history of the internet" and todays lecture as well "CSS".
  8. Save your document in a new project folder called "mini css site" and make sure it is called "index.html"
Part2:
CSS Assignment - Format Your Content
  1. Create a new blank CSS file
  2. Create a set of CSS Rules to format your h1, h2 and p tags
  3. Use CSS to modify the color of your text, the font and the text size
  4. Use CSS to modify your p tag to indent your text and create a colored background for the paragraph
  5. Explore CSS properties to enhance your page, use CSS creatively!
  6. Save your CSS document in the same folder as your HTML file
  7. Create a link in the head of your HTML document to link to your CSS file


Resources:


Tuesday, February 11, 2014

Code Academy: HTML Basics


Students, your newest assignment is to work through the web fundamentals section on code academy. This will reinforce your new code skills and should be much easier for you now that we have a good working knowledge of html. When we complete the web fundamentals we will move on to other units. Watch your achievements grow and track your own progress, code academy makes learning programming languages fun and interactive.

Code Academy Part 1, HTML  and CSS:

  • Log onto codeacademy.com and create an account
  • Edit your profile
  • Click the "Learn" button and begin the "Web Fundamentals" coding exercises
  • Complete all 6 units in the Web Fundamentals lesson
  • Upon completion create a link to your "Achievements" page on your Portfolio Page